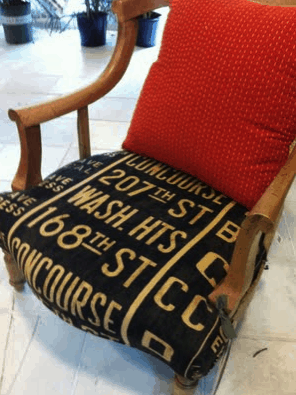
A while ago I started seeing a few different graphic prints featuring streets and neighborhoods in New York City. This poster from Restoration Hardware:
(picture stolen from my friend Erin’s blog)
These are particularly sentimental for us since we lived in Washington Heights and 168 was our subway stop. It’s not the most glamorous part of NYC, so it’s cool to see Wash. Hts used in on more high end furniture. Anywho, I got the idea of making a pillow similar to these prints.
I started with some really nice linen I bought from this etsy shop based in Belarus. I was surprised at the great quality when I received it and it smelled wonderful like good linen should. Then I used these vinyl letter and number stickers found at Lowes or Home Depot (I had to buy 2 packs to make sure I had all the letters I needed). I also used some fabric paint and electrical tape.
First I cut out the size of linen I was going to need to make the pillow, then using a ruler I drew 4 lines in chalk to mark where to place my letters.
Then starting from the middle and the sides I started sticking the letters on one by one, making sure I was getting the spacing right.
For the small “th” letters I cut pieces of electrical tape. I used my cutting mat, rotary cutter and quilting ruler. Each strip was a quarter inch wide and about an inch long–again I just eyeballed it and put the letters together and added lines underneath the ‘th’ like in the other pieces. Luckily they were all straight lines so it made it easier. You could also use masking tape for this part.
Then I made two stripes down the sides just using the electrical tape and it looked like this:
Then I mixed my fabric paint. I just used a brand from the craft store that said it was “soft.” I toyed with the idea of just spray painting this part and I really wish I would have–so that’s my advice to anyone wanting to do this in the future—spray paint. But if you do the fabric paint route here’s my advice–make a huge batch of paint, more than you think you’ll need. And then double it. I was trying to go for an inky blue color, but in the end I didn’t have enough of what I had originally mixed, I ran out of blue so it ended up being a charcoal grey.
Anyway, mix a buttload of paint and with a large brush brush it on. Also, before applying paint press down on all your letters and tape really well so that the lines are nice and neat.
Once it’s covered it will look something like this. Like my zig-zag rug, I did it a little more on the dry brush technique so the paint wasn’t saturated and thus so the pillow wouldn’t feel so stiff.
Wait for the paint to dry, then remove letters. As you can see, there was some bleeding of the paint underneath the letters, but it still looks OK.
Then I washed, sewed and ta-da! Here it is.
I like the look and the overall effect, but the big problem for me is that it happens to be the same dark charcoal as our couch. So I’m not sure I’m going to keep it, but overall I like the look and may give it a go again in a different color and/or spray paint. But I do loving having a little reminder of our NYC days included in our decor.
Hooray.


.jpg)
.jpg)
.jpg)
.jpg)
.jpg)
.jpg)
.jpg)
.jpg)
.jpg)
.jpg)


Looks great!
Fabulous! Good work Miggy!
Awesome, as always! You've piqued my interest– I need to know what good linen smells like. 🙂
I love it!! the hood! takes me back… If you decide you don't like it, I'll buy it from you. Not sure what good linen smells like, but I get a waft of the 168th St station just thinking about it. 🙂
love it! i made a poster similar to the first image on your post (but reversed – white with black text) with SF streets/stops for my apt. it's fun to tie in old memories into home decor!
Love. Are you taking custom orders? 🙂
I love how it turned out!
Thanks everyone!
MS–I have to admit now that I said that, I feel a little silly…it definitely had this flaxy, fresh-from-the-fields smell to it but I'm not sure that's a hallmark of good linen…but perhaps it is to me now!
Nicol–I'll let you know.
Care–that's why I asked you about the font…but in the end it was just easier to buy those already cut letters anyway…I bet your poster looks cool…I wanna see.
Ness–maybe.
Katie and Terese–Thanks!
You are so talented, good job!
Good Job! This is officially one of my favorite diy's ever!
i love it! hey can you use any paint foe this? i always worry about painting material then washing — enlighten me! are there any special washing instructions?
Love it! I am totally going to try this. I think I will do some of our old addresses. Also, your Halloween costumes rocked!
So cool.
Love this! Although I'm not the best at sewing nor do I have a sewing machine. Could you do this on a pillow you already have?
That's fantastic! I love it, thanks for sharing your how to.
I'm amazed at how the letters turned out so nicely! Every time I try to do stencils like this I always end up with at least one letter with a smudged edge. Nice job 🙂
Michelle | Affordable Blinds