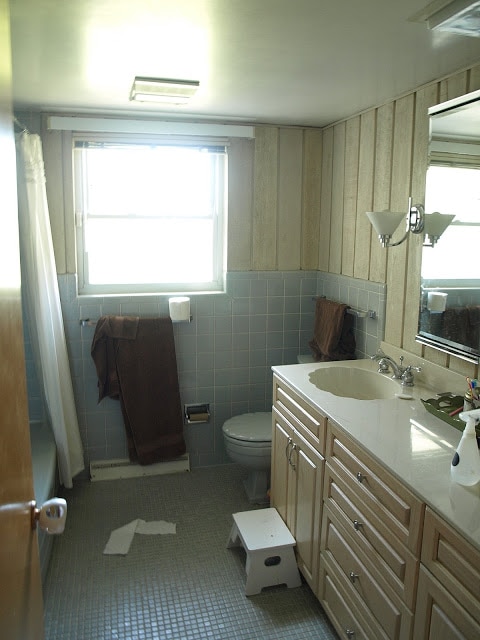
So happy to be finally doing a full bathroom reveal! It was a stressful process for me and a steep learning curve. I love a lot of different design styles out there and was nervous about committing to permanent choices and making decisions for every little thing. One of the reasons I’ve never wanted to build a house is that the idea of choosing every little knob, tile and light fixture makes me break out into a nervous sweat. What if I didn’t like it once it was installed? Or what if I wish I had gone a different direction?
The best thing about this bathroom has been getting to the end and not wanting to change a thing. High-five me!
If the intetnet was invented for the soul purpose of before and after photos, it would be a worthwhile invention. Without further ado, here are some nasty before picture of our blue mid-century meets country bumpkin bathroom:
Wood paneling, blue tile everywhere, the floor crumbling to pieces + out of date fixtures (plus a stray piece of toilet paper on the floor–ha!)
Keep in mind, this bathroom was gutted down to the studs and the layout was completely reconfigured.
The original bathroom was much smaller. As you can see from the photo below there was a small hallway that led to the bathroom with two closets on either side. We pushed the bathroom out to the main hallway and made the closet on the right significantly smaller and kept the closet on the left, but changed the access to the closet from the other side. Also, if you look carefully you can see that the ceiling in the bathroom before was lower than the rest of the house. Apparently this was done back in the day to make the bathroom more “cozy.”
I plan to do a much bigger painting for this space, but put this one is as a small place holder in the meantime. If anyone is interested in purchasing this piece email me and I’ll send you pricing and details.
One of the biggest headaches of this bathroom was the floor. You may remember from my update and remodeling tips post that I talked about addressing difficult problems with your contractor. Well we hadn’t yest crossed this bridge when I wrote that post and this was by far our biggest problem we encountered. When our tile guy first laid the floor it looked terrible. You could see where every individual sheet of tile was laid. (photo below left) At first they tried to fix it by going back and rearranging individual rowes of tile. When they finished “fixing” it, they were scheduled to come in the next day to install the vanity, tub, etc but the floor still looked terrible! My stomach was in knots. We were already waaaay over time, but I didn’t want to leave the floor like this. Of course I didn’t want to confront my contractor either, I knew this was going to be a tough conversation. However, I could not be paying this much money for this bathroom not to have it done right. So I talked to my contractor and we ripped up the entire floor and started over. Oi. It was hard. My contractor wasn’t happy about it, which I understood because it was coming out of his pocket, but it was the right thing to do. The second time around the floor was perfect. (Also, I just want to clarify that overall my contractor was great to work with–but the nature of the situation was just difficult. He stands by his work, was very professional and has a kind and trustworthy team working for him. If anyone in the Cincinnati area is looking for a contractor shoot me an email and I’ll happily pass his info along. )
SaveSave

.jpg)

.jpg)

.jpg)
.jpg)
.jpg)
.jpg)
.jpg)
.jpg)
.jpg)
.jpg)
.jpg)
.jpg)


I love everything about this, I actually think your painting is perfect in there. Kind of feel like I could take a vacation in you bathroom. 🙂
So jealous! My husband remodeled his bathrooms just before we met. They're new, but not at all what I would have picked out.
Wow — it turned out fabulous! Very cool!
Wow — it turned out fabulous! Very cool!
nice!
Renovations can really be tiring but once you see the outcome, everything is worth the pain. I love your new bathroom, definitely looks spacious and children will surely enjoy taking a bath, just like the bathroom renovation stories via essaywriting.education which are all awesome.
It looks amazing!! I am looking to do something similar with a mid century side board. What material did you use for the worktops and where did you find sinks small enough?
Hi Paul. Thanks! The counter top is quartz. We just went to a local place and looked for a remnant big enough. The sinks are American Standard–they weren't that hard to find, we just had to look and measure before we purchased the credenza, but even afterward it was a very tight fit and there was a little jimmy-rigging to get it just right. I'm sure if you googled American Standard small square undermount sink you would find these. Good luck!
Here are a few tips on remodeling a bathroom shower tub that will add to the appearance of this much used room. best shower head with hose
Incredible reno!! Looks so fabulous. What a huge project! We've redone 3 bathrooms in our home this spring but not down to the studs!
That tile floor, AAAAH!! We did that same tile in our powder room and I laid it myself and thankfully it looks great and you can't see the sheet lines! http://www.create-enjoy.com/2017/05/391-dollar-complete-powder-room-makeover.html
Also–I was totally inspired by that Sara Sherman Samuel bathroom, too, for our kitchen! http://www.create-enjoy.com/2017/04/straight-herringbone-tile-backsplash-tutorial.html
I also thought about doing a wood vanity like that but was intimidated by converting a dresser! Is that a new media cabinet or vintage??
Your plumbing fixtures are all so gorgeous!
When you are picking a home renovation contractual worker, think about the accompanying focuses:
electrical contractors hainesport nj
These types of guidelines could very well arrive in handy, specifically if you ever weren't given a set of installations guidance with your new bathroom fixtures or other remodeling components. bathroom remodeling Canoga Park
It was helpful.Thanks for sharing.It looks great. harneymfg
The Jacuzzi is that tub that many people know best. It has a jet system that produces soothing, relaxing and massaging bubbles. There are many types of Jacuzzi tubs, so one is sure to fit your bathroom.http://tubhq.com/review/intex-purespa
The Jacuzzi is that tub that many people know best. It has a jet system that produces soothing, relaxing and massaging bubbles. There are many types of Jacuzzi tubs, so one is sure to fit your bathroom.http://tubhq.com/review/intex-purespa
Obviously there's a sticker price alongside this innovation yet in the event that you need a definitive shower involvement without feeling regretful, this would be a decent approach.shower filter reviews
One of the most appealing things about the traditional bathroom is clutter gives it more of a lived-in effect, thus enhancing the traditional look. Don't be afraid to put plenty of pictures on the walls – black and white family portraits in gold frames are a good look. tiler London
If you don't have the money to hire an architect or contractor for your bathroom remodeling, you can do the work yourself by focusing on simple things that can give a dramatic change to the bathroom.bathrooms
1 with the kitchen remodeling expertise, financial and manpower resources, and also the solid business practices to get your job done right. room addition fontana
Should a local plumber be called to clear the drain professor amos superfast drain cleaner kit
Some of the problems with these cleansing agents is they can get stuck. review of green gobbler
They do mention a reduction of Hydrogen Sulfide, but if you have that in your water, you would know it. best detachable shower head
Wow, cool post. I'd like to write like this too – taking time and real hard work to make a great article… but I put things off too much and never seem to get started. Thanks though. https://showerredefined.com/
Thanks, that was a really cool read! best composting toilet for the cabin
Great article with excellent idea!Thank you for such a valuable article. I really appreciate for this great information.. Read More
Waow this is quite pleasant article, my sister love to read such type of post, I am going to tell her and bookmarking this webpage. Thanks Bathroom renovations