Over a year ago I decided to make my own gauze swaddle baby blanket for Lamp. I wanted something lightweight to wrap her up in and decided I could definitely make something as cute as any aden + anais swaddle blanket. So I tried a star print using a sweet potato as a stamp. The color was wrong and the stars were either too big or too small, in short it was ugly, ugly, ugly. So I never posted it. However, I did end up using this blanket for Lamp anyway as it was still light and breezy like I needed. Well wouldn’t you know it, out of all the blankets in her vast blankie collection she has choose this one to be her lovie. There is one other plain brown gauze blankie she sometimes goes back and forth from, but right now ugly star blankie has her heart.
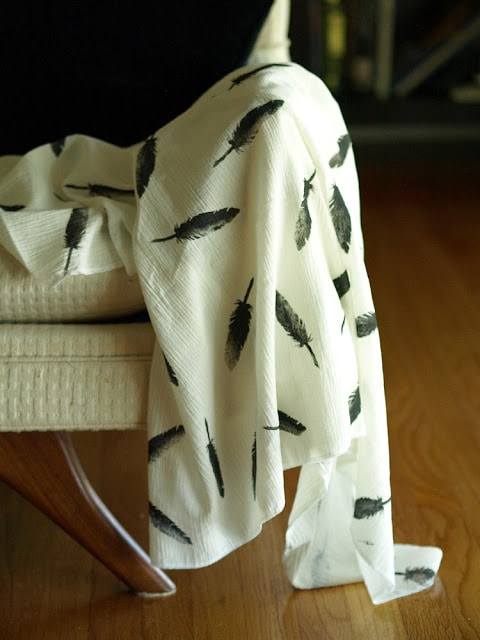
So even though I’ve been running around like a crazy woman with a crazy-long to do list, when inspiration struck I just had to stop and make her another blankie. So without further ado, here is the Feather Swaddle Blanket tutorial.
**********
2. Then I decided I wanted to do a feather pattern. So I googled “feather silhouette” just to get a basic idea of what I wanted. You can see the one I decided to model my stamp after. So you know… do that.
3. Next cut a slice of your potato straight and smooth through. You want the surface to be even so cut straight! Trace your feather on there with a pen, I just freehanded it, then trace all around your feather with an exacto blade. After than just start taking chunks out with your knife by scoring from the feather out, and then cutting under with a knife. This is the trickiest part to explain, but I think you can figure it out. Be sure to leave some little feather sticking out near the base of the stem… definitely the trickiest part to cut, but it’s hard to mess up.
4. Next take your exacto and cut little triangle notches out of the side of the feather. Refer back to the Google image if you need help with placement.
5. Now is a good time to take a quick test run of your stamp on some paper. Once you’re satisfied, coat your stamp with paint using a sponge applicator or paint brush. I liked the idea of using black against this cream colored gauze.
6. Now prepare your fabric to be stamped by spreading it out and putting paper underneath.
7. Now stamp, applying even pressure and gently rocking back and forth to get a good image. Make sure to reapply paint in between each stamping.
Note: I didn’t plan for the feather to have the variations you see above with the paint being lighter on some prints, but I really like how it turned out.
8. Once your whole blankie is stamped go around the edges with either a serger or a zig-zag stitch on a regular sewing machine.
And your done! I really like how the swaddle blanket turned out and I hope you love the tutorial. When I showed B the blanket he had no idea I printed it, he thought I was showing him some new fabric I bought. I think this could also be made into a cool gauzey type scarf!
But the real test…how does Lamp like it?
She’ll stick with her ugly star blanket thankyouverymuch.
Figures…


.jpg)

.jpg)
.jpg)
.jpg)
.jpg)
.jpg)
.jpg)


That's because she knows her mama made it with love, regardless of the end result, and that's all that counts.
Where did you get your fabric? My grand daughter loooves her gauze-y sleep sack. A sleep sack is the last thing you need in Texas, but I can't bear to pay the price of buying the blankets.
Melissa–but I made this with MORE love. 🙂
Arlene–you can get gauze at Joanne's but it seems to go out of stock fast and only available in the spring/summer. Check online fabric stores…I'm sure you'll find some.
Oh and you sew! Of course you do! Love the blanket.
This is really beautiful. I can see it working well for curtains or tablecloths or pillows… I'm really impressed with your feather stamp 🙂
love this! I need to try stamping my own.. the ones I've made are so boring. Thanks for the idea and the tutorial.
That has to be the most elegant looking potato stamping I've ever seen! Bravo!
love, love!! i need to try this.
Oh how I love this post.
This is AWESOME !!!!! I am definitly going to make one for my boyfriends new baby sister. Yes my boyfriend is 23 with a 6 month old sister. … I LOVE it. It cures my own baby fever lol
wow, this turned out great. i am really impressed.
do you have to heat set the paint so it doesn't come off when you wash it?
Thanks everyone!
Anon–It depends on the brand of fabric…for this paint I didn't have to. Just for the record I use just about any paint on fabric–including latex house paint in the little sample jars. For the baby blanket I thought this would be nice since it's "soft" fabric paint. Hope that helps!
That is awesome! It's even cuter than the A+A's! I never would have thought of making my own, you're amazing.
Great looking blanket. I'm going to try it myself and give it as a gift for one of my friends.
Absolutely gorgeous! I might have the feather print some linen and sew up atop, thanks for the tutorial!
Found you via Pinterest and I LOVE this idea! Thanks for posting such a fabulous tutorial…I'm always looking for easy baby gift ideas. Will definitely be making this one. {And my son loves blankets.}
I'm your newest follower. 🙂
No way! I can't believe you did that feather stamp. So great.
This is gorgeous!
I absolutely love this! I tried making a feather stamp from a big chunk of rubber, but I guess it was of poor quality because it kept braking off at the finest lines while I was cutting and shaping it!
But this is genius! I love it!
With all my respect and envy!
amazing how great minds work!!! It turned out wonderful.
What a lovely DIY and beautiful result!
Oh! It`s great! Amazing! Your feathers like real!
Bravo ! C'est très joli et quelle bonne idée!
Fantastic !
Oh my word! I cant believe how fantastic this is! Well done you-I just found your blog via Anya Adores. the feather design is beautiful-the kids have been asking to do some feather potato prints for weeks-I didn't think it was possible to be so detailed, but you've inspired me now!! 🙂
This is great! I love that you used a potato – easy to get hold of and looks so professional!
love this! totally using this idea to make a prop for my next photoshoot! -Michelle
What an amazing idea!! I followed your tutorial to decorate a tote. This was my first potato print and i absolutely love the outcome, i'm planning on using this potato on some bedsheets too 😀 Here's a link to a photo of my outcome: http://postimg.org/image/5930vjb71/
This looks great! Will have to try it out with different patterns. Thanks for the tutorial, Miggy!
it's gorgeous and the instructions were all clear 🙂 thanks !
Leather colorant kits can be used to restore worn patches, large areas of co lour loss or even to change the co lour of your leather.
For more information kindly visit:- leather colorant kit
I really want to make something like this. Do you have a precise name for this type of fabric? I asked a lady at a fabric store, and when she showed me the muslin, it was either very coarse or too loose a weave.
@ Jennifer….. look up cotton gauze on Bing… it took me right to several online stores that sell it.
How well does this keep? With washing, will it fade?
Since I used fabric paint it hasn't faded at all over the years. That being said, it doesn't get washed much either since I don't have a little baby anymore.
Did you cooked the potato? When i use a normal raw potato it is so wet and i guess it should be more dry.
Awesome DIY baby blanket idea! I'm really glad I ran across this site and was able to see this blanket tutorial. Very personalized and special.
Parabéns
Adorei te encontrar e saber um pouco de sua história familiar.
Amo o faça você mesmo e você tem idéias fantásticas.
As bonecas, são para mim muito especiais, pois as faço para doar a crianças carentes em meu país (Brasil)>
abraço
Healthier living is making an impact round the world and bringing new and exciting products to our shores. Silk Blanket
Superbly written article, if only all bloggers offered the same content as you, the internet would be a far better place.. silk bedding
Lovely sharp post. Never considered that it was that easy. Praises to you! down comforter